-
Productos
-
-
Sistemas de impresiĂłn
- Equipos de Fotoacabado
- FotografĂa
- Soluciones de ImpresiĂłn
-
Quienes Somos
-
Querida InnovaciĂłn

Explora las mĂşltiples facetas de Fujifilm


Practical Features 2
Image Quality Control
Color, Tone & Sharpness Adjustment
Fine-tune image quality with “COLOR” for color saturation adjustment, “HIGHLIGHT TONE” and “SHADOW TONE” for tweaking contrast in highlights and shadows, and “SHARPNESS” to stress or soften image outlines. With this built-in detailed image quality control, you can produce an image that precisely matches your creative objectives.
Noise Reduction Control
Choose from 5 different levels of noise reduction depending on whether your priority is the crispness of resolution or keeping noise reduction to a minimum, and explore the capability to tune sensitivity-related textural quality when shooting high-sensitivity scenes.
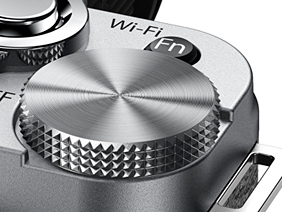
Exposure Compensation Control at Your Thumbtip
When you want to make slightly lighten or darken the image before snapping the shot, Exposure Compensation control is right at your thumb. Use the main command dial without taking your eye away from your shot and smoothly adjust image brightness within a range of ±2EV.
Focusing
Focusing Mode Selection
Go to the Shooting Menu to choose the right Focusing Mode for the scene (Manual, Auto Area, Area Selection AF, Continuous AF, Auto Tracking AF).
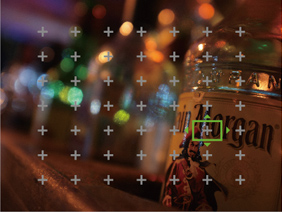
Selectable AF with a 49-point Metering matrix
Within the 49-point matrix of the auto focus area on the screen, AF accurately and swiftly recognizes the primary subject and brings it into crystal clear focus. It also lets you freely select the position of the AF frame. Using the LCD monitor, you also can change the AF frame size and pinpoint the focusing.
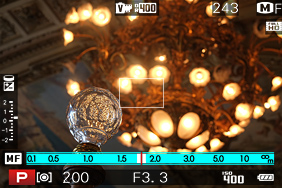
Manual Focus
The distance index bar displayed on the LCD together with the depth of field scale and aperture value provides helpful guides for focusing.
Focus Peak Highlight function for sharper manual focusing.
When manually adjusting focus, this function highlights high contrast areas of your subject for smoother and more precise fine tuning of focusing.
AF Assist Lamp for Low-Light Scenes
In low light scenes when even the subject is hard to see through the viewfinder, AF Assist Lamp illuminates the subject and assists Auto Focus.
Powerful Built-in Auto Bracketing Functions
Empowering you with a choice of 4 different auto bracketing functions (AE, ISO Sensitivity, Dynamic Range and Film Simulation), the FUJIFILM X-M1 lets you experience the wide world of photographic expression.
Dynamic Range Bracketing
Capture 3 exposures of the same scene with high-speed continuous shooting, each at a different dynamic range setting (100%, 200% & 400%).

- 100%
- 200%
- 400%
Film Simulation Bracketing
Just release the shutter once and produce 3 images of the scene based on a single exposure, each image with a different Film Simulation effect that you have freely selected and pre-set.

- PROVIA
- Velvia
- ASTIA
AE Bracketing
One press of the shutter captures 3 shots of the same scene at different exposures. AE bracketing can be set in 1/3, 2/3 and 1 EV steps.
ISO Sensitivity Bracketing
Based on a single exposure, the scene is automatically reproduced as 3 images, each with a different ISO sensitivity and without changing the shutter speed and aperture, letting you capture the moment with varying degrees of brightness. Setting is possible in 1/3, 2/3 and 1 EV steps.
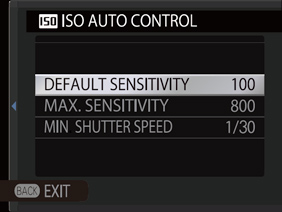
ISO Sensitivity
ISO100 - 25600 Sensitivity setting range
Select from the broad sensitivity range of ISO100 - 25600 for shooting at a full 16-megapixel resolution. The FUJIFILM X-M1 also lets you set the AUTO ISO range (up to ISO 400 - 6400) and the shutter speed limit. For quick access to ISO settings, you can assign this function to the Fn or Q Button.
White Balance Setting
Compensate for the color of different light sources with a choice of 7 white balance presets in addition to Auto White Balance.
Precise White Balance Setting
Fine tune white balance by adjusting R (red) ⇔ Cy (cyan) and B (blue) ⇔ Ye (yellow) in ±9 steps. You can make adjustments and confirm their effect on the actual image during shooting. With this powerful setting, you can adjust individual white balance parameters, tweak settings for the more accurate correction of white balance or explore the creative effects that can be achieved with filters.
RAW Shooting
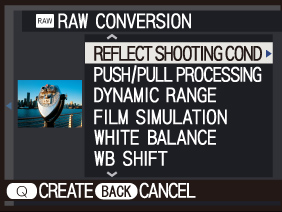
In-camera RAW Converter
The FUJIFILM X-M1's built-in RAW data converter lets you view and edit your results without the need for your PC. The conversion of RAW data not only takes into account exposure compensation, white balance and other in-camera image quality control settings, but also lets the user apply Film Simulation modes in the converter mode.
Special FUJIFILM X-M1 RAW Conversion Software Included
For the management, viewing and conversion of RAW image data on your PC, you will find a special FUJIFILM X-M1 version of the powerful and easy-to-use RAW conversion software powered by SILKYPIX® included in your camera box.
Self Timer (2 or 10 seconds)
Use the menu to select the Self Timer function. It is not only great for group photos, but also comes in handy in macro photography and low exposure shots when you want to avoid blur caused by manual shutter release.
Nota
- · Las fotos de muestra son imágenes simuladas.
- Productos
- División Consumo
- División Especializados
- Soporte
Otros productos- Quienes Somos